Introduction
"JTAG to AXI Master" IP를 이용하여 XADC를 monitoring하는 방법에 대하여 설명하겠습니다.
(여기서는 간단하게 XADC를 이용하여 FPGA Device의 온도(Temperature)를 monitoring 하겠습니다.)
Test를 위한 PC 사용환경은 다음과 같습니다.
- OS : Windows 10 Pro ( version : 20H2 )
- Vivado version : 2020.2.2
- Target Board : Artix-7 50T Evaluation Board
- Working Directory : C:/My-Study/XADC_test
- Example Design : XADC_test.zip
How to monitor XADC with "JTAG to AXI Master" IP
1.
Example Design의 Block Design을 보면 다음과 같이 "JTAG to AXI Master" IP와 "XADC Wizard" IP를 "AXI Interconnecter"를 사이에 두고 연결되어 있는 것을 확인할 수 있습니다.
("JTAG to AXI Master" IP에 대해서는 "Using the JTAG-to-AXI to test Peripherals on Artix-7 board" BLOG 내용을 보면 자세한 사용법을 알 수 있습니다.)

2.
Example Design의 Block Design에서 "XADC Wizard" IP의 setting은 다음과 같습니다.


3.
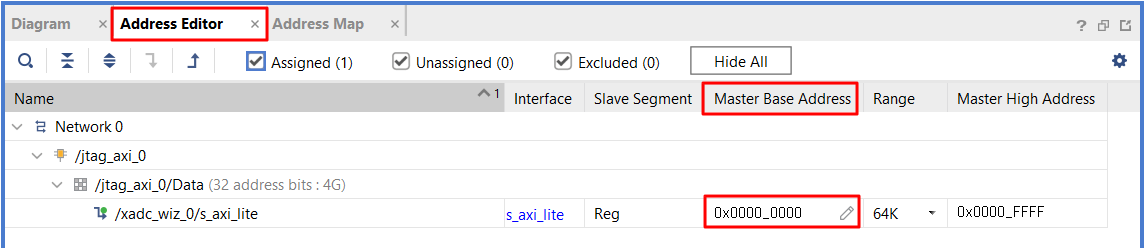
Address Editor에서 XADC의 Master Base Address를 "0x0000_0000"으로 설정합니다.
4.
Example Design의 Block Design에서 "XADC Wizard" IP의 입력과 출력을 살펴볼 수 있도록 다음과 같이 "System ILA" IP와 "ILA" IP를 사용합니다. (이 부분을 적용하지 않더라도 XADC를 이용한 온도(Temperature)의 monitoring은 가능합니다.)

5.
Example Design에서 "Generate Bitstream"까지 완료한 후, "Open Hardware Manager"를 하여 다음과 같이 Artix-7 50T Evaluation Board에 ".bit" file을 ".ltx" file과 함께 "Program Device..."를 실행 합니다.
6.
PG091 October 5, 2016 - xadc-wiz v3.3 문서의 page 17를 보면 다음과 같은 내용을 확인할 수 있습니다.
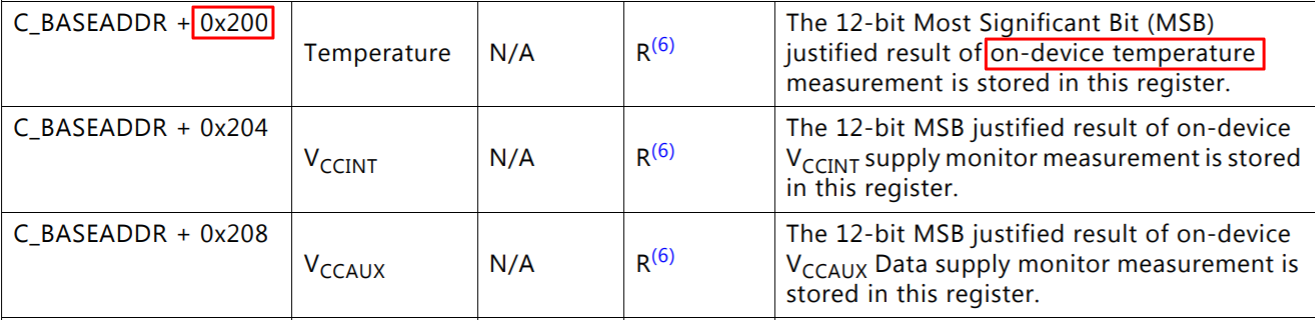
그러므로 address 0x0000_0200의 Data를 Read하면 현재 온도(Temperature)를 알 수 있습니다.
7.
TCL console에 다음의 TCL command를 기입한 후, Enter합니다.
(아래는 address 0x0000_0200의 Data를 Read하는 TCL command입니다.)
| TCL command (Read Operation) |
| create_hw_axi_txn -force rd_txn0 [get_hw_axis hw_axi_1] -address 00000200 -len 1 -type read run_hw_axi rd_txn0 |

8.
다음과 같이 address 0x0000_0200의 Data가 "0x0000_9f08" 임을 확인했습니다.

Data "0x0000__9f08"에서 우리는 "9f0"의 값만 취합니다. Hex "9f0"의 값은 DEC "2,544" 입니다.
온도는 다음과 같이 계산 됩니다.
( (2,544 x 503.975) / 4096 ) - 273.15 = 약 39도

지금까지 XADC를 이용하여 FPGA Device의 온도(Temperature)를 monitoring 방법에 대하여 알아보았습니다.
여러분의 FPGA 설계에 조금이라도 도움이 되었으면 합니다.
오늘도 좋은 하루 되세요.
(공감, 구독, 댓글은 저에게 힘이 됩니다!)
Create Date: Jun 02, 2021
Posted By: Mouessee
Xilinx 본사는 한국 내에 Corporate and Sales Distributor로 MAKUS를 두고 있습니다.
Xilinx 국내 Corporate and Sales Distributor인 MAKUS는 XIlinx FPGA Device를 기술영업을 통해 판매하며 기술지원이 가능합니다.
MAKUS www.makus.co.kr
관련 BLOG
------------------------------
------------------------------
2022.08.31 - [Xilinx/Vivado] - Using the JTAG-to-AXI to test Peripherals on Artix-7 board (1/2)
Using the JTAG-to-AXI to test Peripherals on Artix-7 board (1/2)
Introduction JTAG to AXI Master (PG174 - October 5, 2016) 라는 IP를 사용하면, Vivado Hardware Debug Manager의 TCL console을 통하여 JTAG을 지나서, FPGA 내부 Design된 JTAG-to-AXI Master IP를 지나서,..
740280.tistory.com
How to monitor XADC with "JTAG to AXI Master" IP
How to monitor XADC with "JTAG to AXI Master" IP
Introduction "JTAG to AXI Master" IP를 이용하여 XADC를 monitoring하는 방법에 대하여 설명하겠습니다. (여기서는 간단하게 XADC를 이용하여 FPGA Device의 온도(Temperature)를 monitoring 하겠습니다.) T..
740280.tistory.com
'Xilinx > Vivado' 카테고리의 다른 글
| Little / Big Endian과 MSB-First, LSB-First의 의미 (0) | 2022.09.08 |
|---|---|
| Warning message occurred when installing Vivado 2022.1 (0) | 2022.09.06 |
| Using the JTAG-to-AXI to test Peripherals on Artix-7 board (2/2) (0) | 2022.08.31 |
| Using the JTAG-to-AXI to test Peripherals on Artix-7 board (1/2) (1) | 2022.08.31 |
| How to install a Board Definition file (0) | 2022.08.16 |