Introduction
Xilinx UltraScale+ Devices Integrated Block for PCI Express를 사용하면 Vender ID, Device ID, Revision ID, Subsystem Vender ID, Subsystem Device ID를 변경할 수 있는 Option이 제공됩니다.
다음 두 가지 방법으로 설명을 진행하겠습니다.
UltraScale+ Integrrated Block (PCIE4) for PCI Express에서 진행하는 방법을 설명하겠습니다.
DMA/Bridge Subsystem for PCI Exprress에서 진행하는 방법을 설명하겠습니다.
그리고 PCIe ID 부분에 대하여 설명하겠습니다.
Test를 위한 PC 사용환경은 다음과 같습니다.
- OS : Windows 10 pro ( version : 21H2 )
- Vivado version : 2022.1
Table of Contents
1.
"Enable PCIe-ID Interface" option of UltraScale+ Integrrated Block (PCIE4) for PCI Express
2.
"Enable PCIe-ID Interface" option of DMA/Bridge Subsystem for PCI Express
3.
"PCIe-ID" 관련 설명
"Enable PCIe-ID Interface" option of PCIE4 Block
1.
Block Design에서 Add IP를 클릭한 후, Search 란에 PCIE라고 기입합니다. 그리고 UltraScale+ Integrrated Block (PCIE4) for PCI Express를 더블클릭합니다.
2.
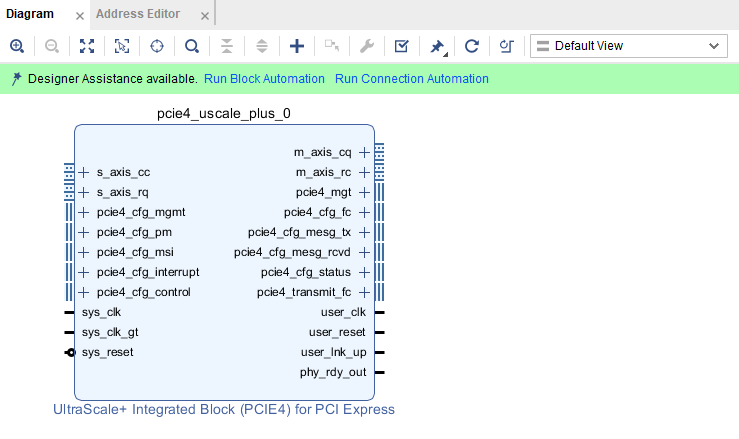
다음과 같이 Block Design에서 UltraScale+ Integrrated Block (PCIE4) for PCI Express의 Symbol을 확인할 수 있습니다.
3.
Block Design에서 UltraScale+ Integrrated Block (PCIE4) for PCI Express를 클릭한 후, Customize Block을 클릭합니다.
4.
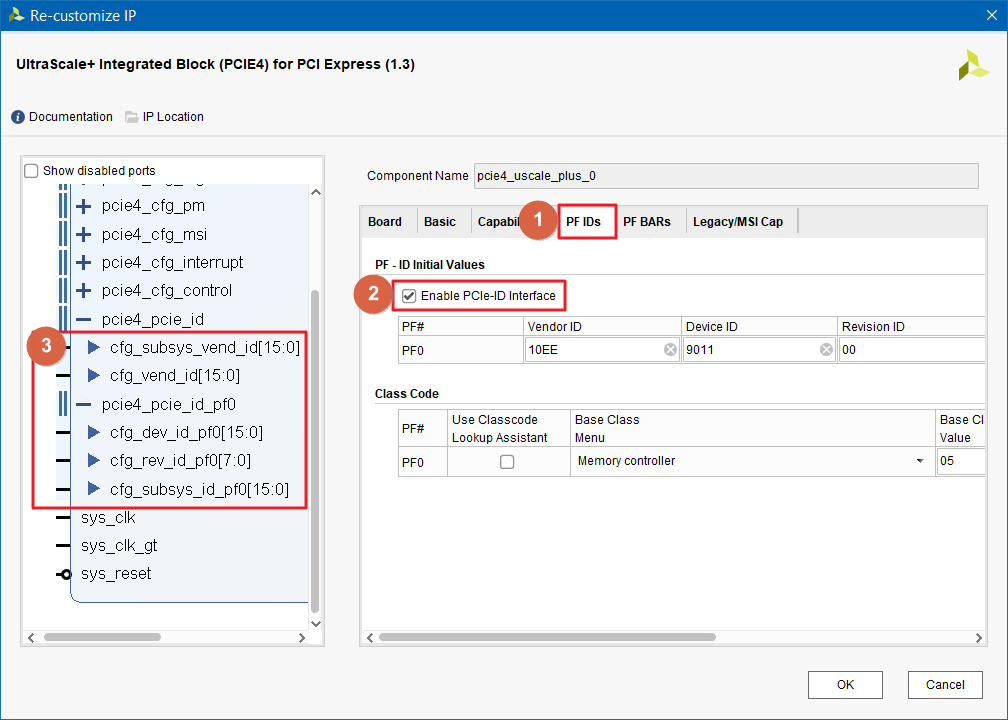
Re-customize IP 창이 띄워지면, "PF IDs" 탭을 클릭합니다. 그리고 "Enable PCIe-ID Interface" option을 Check 합니다. 이후 왼쪽 Symbol에 PCIe ID 관련 Pin들이 보이게 됩니다.
5.
이러한 Pin들을 이용하여 Vender ID, Device ID, Revision ID, Subsystem Vender ID, Subsystem Device ID를 변경할 수 있습니다.
"Enable PCIe-ID Interface" option of DMA/Bridge Subsystem
1.
Block Design에서 Add IP를 클릭한 후, Search 란에 DMA라고 기입합니다. 그리고 DMA/Bridge Subsystem for PCI Express를 더블클릭합니다.

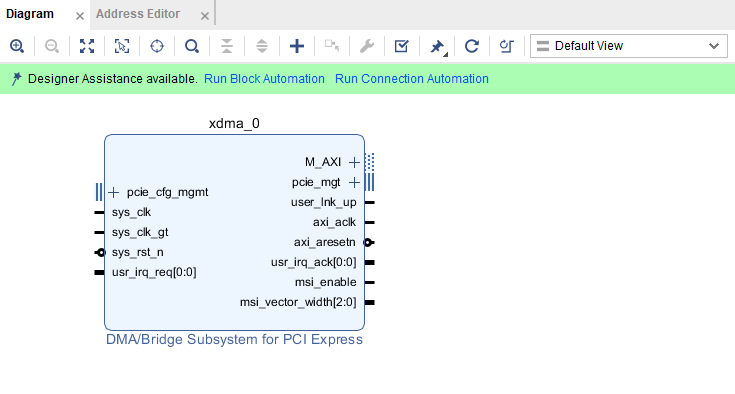
2.
다음과 같이 Block Design에서 DMA/Bridge Subsystem for PCI Express의 Symbol을 확인할 수 있습니다.
3.
Block Design에서 DMA/Bridge Subsystem for PCI Express를 클릭한 후, Customize Block을 클릭합니다.
4.
Re-customize IP 창이 띄워지면, "PCIe ID" 탭을 클릭합니다. 그리고 "Enable PCIe-ID Interface" option을 Check 합니다. 이 후 왼쪽 Symbol에 PCIe ID 관련 Pin들이 보이게 됩니다.
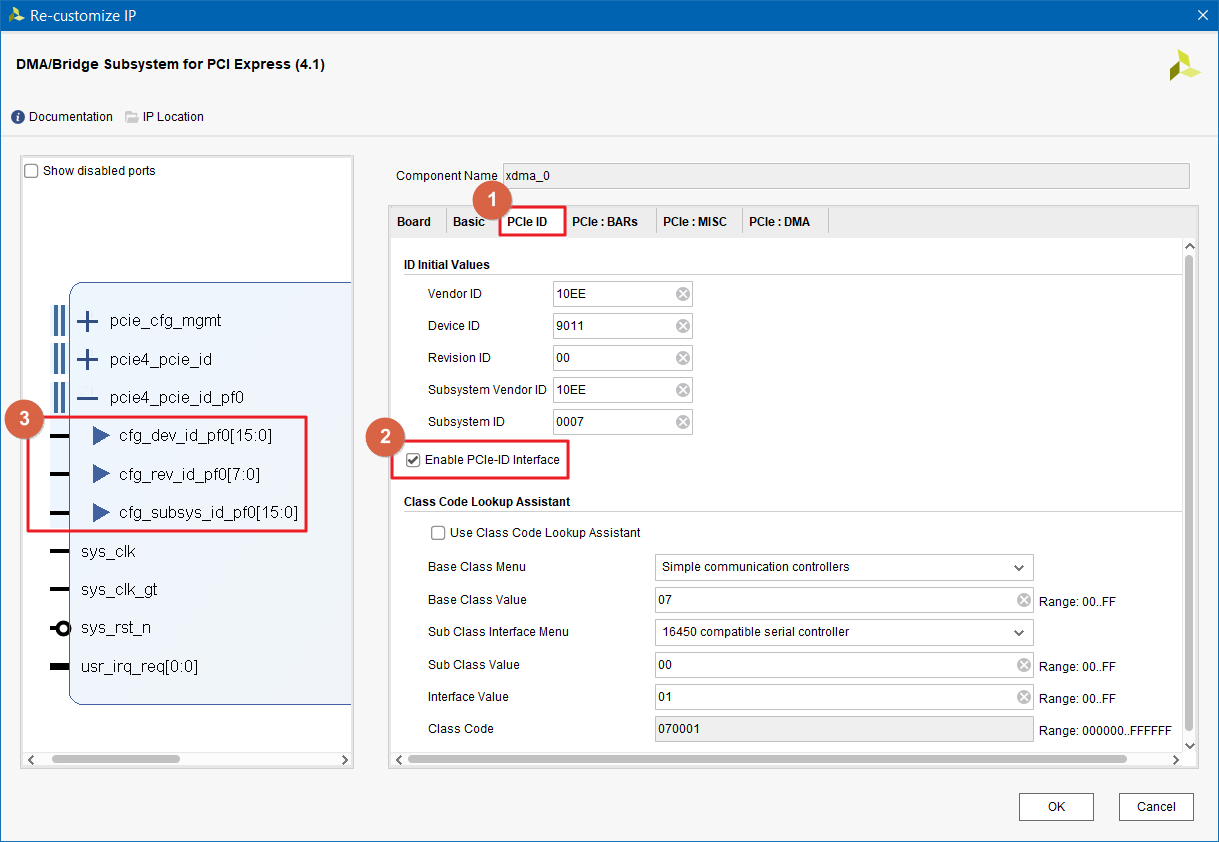
5.
이러한 Pin들을 이용하여 Vender ID, Device ID, Revision ID, Subsystem Vender ID, Subsystem Device ID를 변경할 수 있습니다.
"PCIe-ID" 관련 설명
1.
Xilinx가 제공하는 Initial Value를 그대로 사용할 경우는 문제가 없지만, 원하는 Vender ID, Device ID를 사용하려면 PCI SIG에 연간 비용을 지불하고 맴버 등록을 하여야 합니다.
아래 링크의 웹사이트를 보면 보다 자세한 내용을 확인할 수 있습니다.
2.
아래의 표를 보면 Revision ID, Subsystem Vender ID, Subsystem Device ID의 경우는 PCI SIG 에 등록하지 않아도 변경하여 사용이 가능합니다.
| Vendor ID | “Vendor ID” if you need to use a specific value need to register with PCI-SIG based on terms. |
| Device ID | “Device ID” if you need to use a specific value need to register with PCI-SIG based on terms. |
| Revision ID | “Subsystem Vendor ID” if you need to use a specific value don’t need to register with PCI-SIG based on terms. |
| Subsystem Vendor ID | “Subsystem Device ID” if you need to use a specific value don’t need to register with PCI-SIG based on terms. |
| Subsystem Device ID | “Revision ID” if you need to use a specific value don’t need to register with PCI-SIG based on terms. |
Main Board에 두 개 이상의 PCIe Board(end-point)를 장착할 경우가 있습니다. 이 경우에 OS는 두 개 이상의 PCIe Board를 구분하여야 하는데 이를 위하여 Revision ID를 다르게 적용해야 합니다.
지금까지 Vender ID, Device ID, Revision ID, Subsystem Vender ID, Subsystem Device ID를 변경할 수 있는 방법에 대하여 알아보았습니다.
여러분의 FPGA 설계에 조금이라도 도움이 되었으면 합니다.
오늘도 좋은 하루 되세요.
(공감, 구독, 댓글은 저에게 힘이 됩니다!)
Feb 21, 2023
Posted By: Mouessee
Xilinx 본사는 한국 내에 Corporate and Sales Distributor로 MAKUS를 두고 있습니다.
Xilinx 국내 Corporate and Sales Distributor인 MAKUS는 XIlinx FPGA Device를 기술영업을 통해 판매하며 기술지원이 가능합니다.
MAKUS www.makus.co.kr
관련 BLOG
------------------------------
------------------------------
'Xilinx > IPs' 카테고리의 다른 글
| [ PCIe ] DMA/Bridge Subsystem for PCI Express (0) | 2023.02.21 |
|---|---|
| [ PCIe ] Xilinx DMA Windows Driver (0) | 2023.02.21 |
| [ PCIe ] How to enable / disable "Test Mode" on Windows 10 (0) | 2023.02.21 |
| MIP Pin Mapping Guide for DDR3/4, RDIMMs, LRDIMMs (0) | 2022.08.16 |
| 현재 사용하고 있는 Xilinx IP의 알려진 Bug Issue를 확인하는 방법 (0) | 2022.08.03 |